The Save Gmail to Google Drive add-on lets you automatically download email messages and file attachments from Gmail to your Google Drive. You can save the email messages as PDF while the attachments are saved in their original format.
Transcribe Gmail Attachments
The latest version of the Gmail add-on adds support for transcribing audio and video attachments in Gmail messages. The transcription is done with the help of OpenAI’s Whisper API and the transcript is saved as a new text file in your Google Drive.
Here’s a step by step guide on how you can transcribe audio and video attachments in Gmail messages to text.
Step 1. Install the Save Gmail to Google Drive add-on from the Google Workspace marketplace. Open sheets.new to create a new Google Sheet. Go to the Extension menu > Save Emails > Open App to launch the add-on.

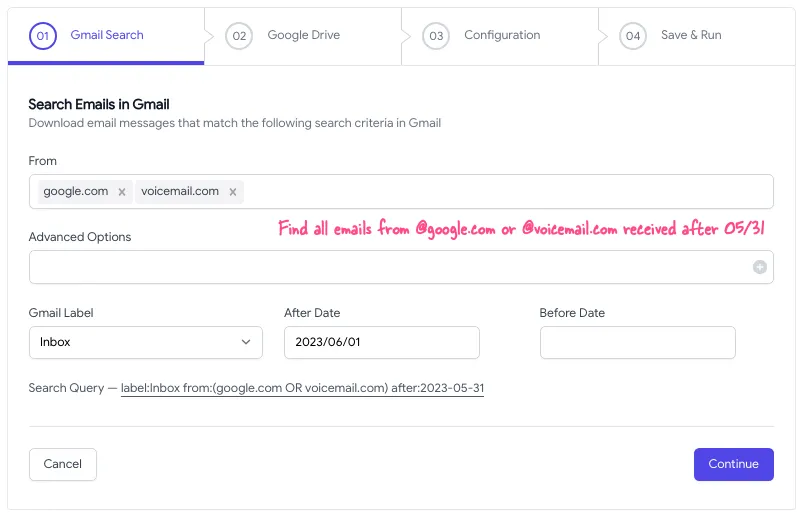
Step 2. Create a new workflow and specify the Gmail search criteria. The add-on will scan the matching email message for any audio and video files.
OpenAI’s speech-to-text API supports a wide range of audio and video formats including MP3, WAV, MP4, MPEG, and WEBM. The maximum file size is 25 MB and you’ll always be in the limit since Gmail doesn’t allow you to send or receive files larger than 25 MB.

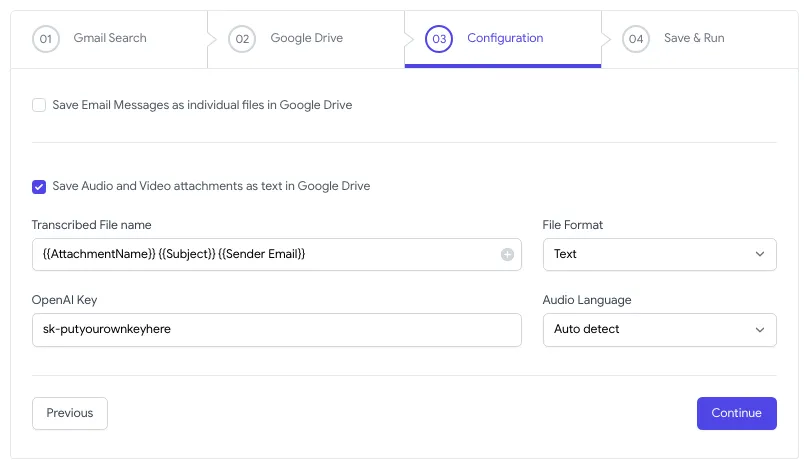
Step 3. On the next screen, check the option that says Save Audio and Video Attachments as text and choose the file format, text or PDF, in which you would like to save the transcript.
You can include markers in the file name. For instance, if you specify the file name as {{Subject}} {{Sender Email}}, the add-on will replace the markers with the actual sender’s email and the email subject.
You would also need to specify the OpenAI API key that you can get from the OpenAI dashboard. OpenAI charges you $0.006 per minute of audio or video transcribed, rounded to the nearest second.
Save the workflow and it will automatically run in the background, transcribing messages as they land in your inbox. You can check the status of the workflow in the Google Sheet itself.
Also see: Speech to Text with Dictation.io
Speech to Text with Google Apps Script
Internally, the add-on uses the Google Apps Script to connect to the OpenAI API and transcribe the audio and video files. Here’s the source code of the Google Script that you can copy and use in your own projects.
// Define the URL for the OpenAI audio transcription API
const WHISPER_API_URL = 'https://api.openai.com/v1/audio/transcriptions';
// Define your OpenAI API key
const OPENAI_API_KEY = 'sk-putyourownkeyhere';

// Define a function that takes an audio file ID and language as parameters
const transcribeAudio = (fileId, language) => {
  // Get the audio file as a blob using the Google Drive API
  const audioBlob = DriveApp.getFileById(fileId).getBlob();

  // Send a POST request to the OpenAI API with the audio file
  const response = UrlFetchApp.fetch(WHISPER_API_URL, {
    method: 'POST',
    headers: {
      Authorization: `Bearer ${OPENAI_API_KEY}`
    },
    payload: {
      model: 'whisper-1',
      file: audioBlob,
      response_format: 'text',
      language: language
    }
  });

  // Get the transcription from the API response and log it to the console
  const data = response.getContentText();
  Logger.log(data.trim());
};
Please replace the OPENAI_API_KEY value with your own OpenAI API key. Also, make sure that the audio or video file you want to transcribe is stored in your Google Drive and that you have at least view (read) permissions on the file.
Transcribe Large Audio and Video Files
The Whisper API only accepts audio files that are less than 25 MB in size. If you have a larger file, you can use the Pydub Python package to split the audio file into smaller chunks and then send them to the API for transcription.
If the video file is large in size, you may extract the audio track from the video file using FFmpeg and send that to the API for transcription.
# Extract the audio from video
ffmpeg -i video.mp4 -vn -ab 256 audio.mp3

## Split the audio file into smaller chunks
ffmpeg -i large_audio.mp3 -f segment -segment_time 60 -c copy output_%03d.mp3
FFmpeg will split the input audio file into multiple 60-second chunks, naming them as output_001.mp3, output_002.mp3, and so on, depending on the duration of the input file.


