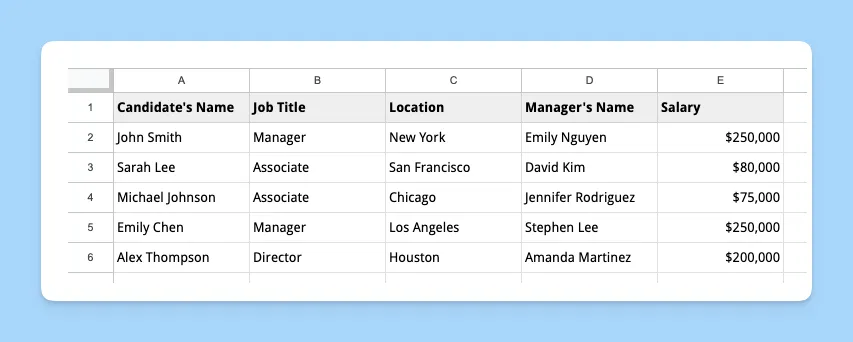
Conditional content allows you to customize your Google Docs template and generate different versions of the same document based on the user’s answers. In this tutorial, I’ll show you how to use conditional content in Google Docs using Document Studio, a Google add-on that automates document creation.
If you are new here, please follow this step-by-step guide on how to generate documents from data in Google Sheets and Google Forms responses.
Conditionally Display Content

Let’s say you are a recruiter who wants to use a Google Docs template to send out job offer letters to candidates. You want to include specific information in the offer letter based on the candidate’s job title and location.
The conditional statements that we would like to include in the document template are:
- Your office is located in San Francisco. Your offer letter should include a paragraph offering relocation benefits only to candidates who are located outside SF.
- If the candidate is offered an Associate position, they are eligible for basic benefits.
- If the candidate is hired for a senior position, like Manager or Director, they are entitled to additional benefits like 401(k) retirement plan.
Define the conditional sections
Create a new Google Docs document and create a job offer letter template. Include sections for the candidate’s name, job title, location, salary, and benefits package.

Use the <<if>> and <<endif>> expressions to define the conditional sections in your template. For example, you might use the following expressions to show or hide the relocation package section based on the candidate’s location:
<<If: ({{Location}} != 'San Francisco')>>
We are pleased to offer you a relocation package to assist with your move from {{Location}} to our main office.
<<EndIf>>
Similarly, you can wrap the benefits paragraph with the <<if>> and <<endif>> expressions to show or hide the benefits package section based on the candidate’s job title:
<<If: OR (({{Job Title}} == 'Manager'), ({{Job Title}} == 'Director'))>>
As {{Job Title}}, you will be eligible for our comprehensive benefits package, which includes health, dental, and vision insurance, a 401(k) retirement plan, and more.
<<EndIf>>
You may also use the
~contains operator in place of==equals operator for partial matches. For instance,{{Job Title}} ~ 'Manager'will matchSales Manager,Senior Manager,Managerand so on.
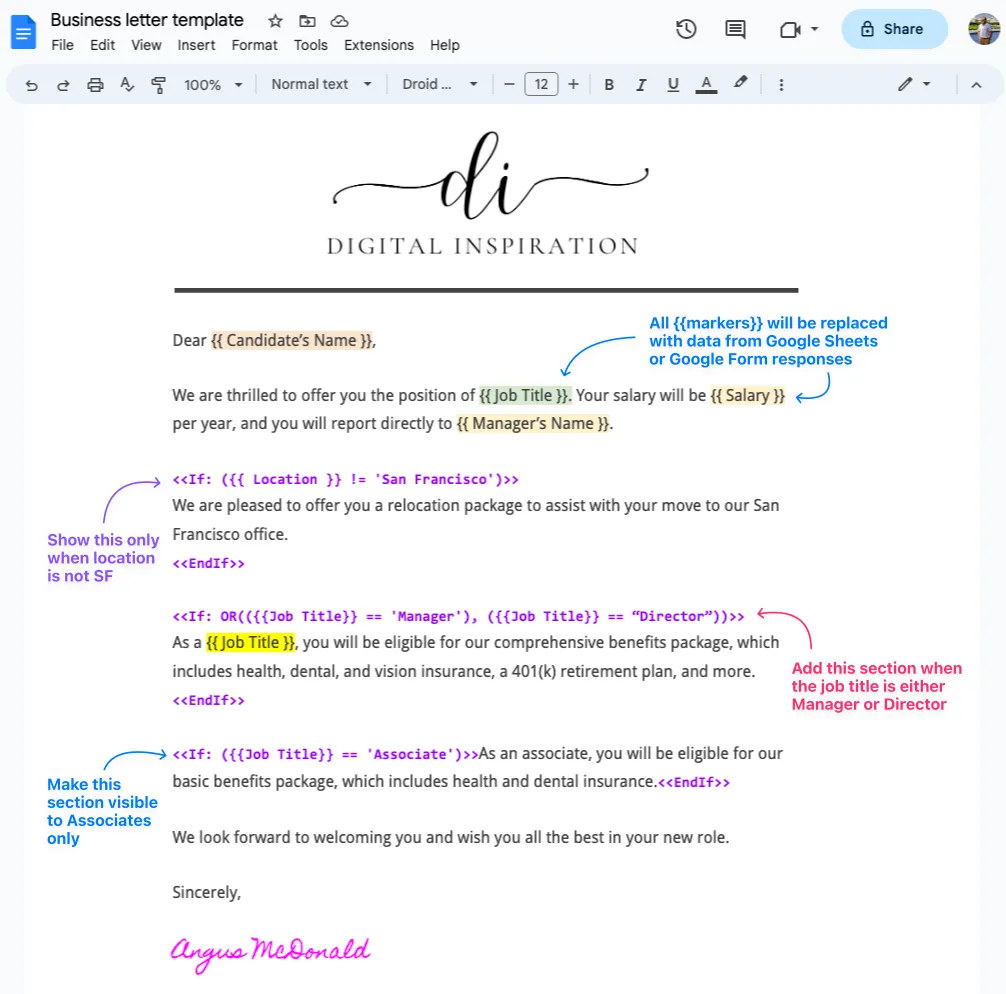
Here’s how the final job offer letter template looks like.
In addition to document templates, you can also add conditional text in email templates with the help of scriptlets.
Things to know:
- You may not nest IF statements inside each other.
- You can use the
OR,ANDorNORoperator to combine multiple conditions. - If you have a table in your document that should be displayed conditionally, you should put the wrapping
<<if>>and<<endif>>tags outside the table. - It is currently not possible to hide or show specific rows or columns of a table based on the user’s answers.


