The BHIM UPI payment system has transformed the way we pay for goods and services in India. You scan a QR Code with your mobile phone, enter the secret PIN and the money gets instantly transferred from your bank account to the merchant’s bank account. There’s no transaction fee, the money is transferred in real-time and no data of the payer is shared with the payee.
Our online store initially accepted payments through credit cards only but after we added the UPI QR Code on the checkout page, more that 50% of customers in India are making payments through UPI. Other than instant payouts, the big advantage of UPI is that the merchant need not pay any transaction fee to PayPal or Stripe.
Create Dynamic UPI QR Codes
When you sign-up for any UPI app, be it PhonePe, Paytm, Google Pay, WhatsApp, Amazon Pay or any other BHIM UPI app, they will all provide you with a downloadable QR Code that you can attach in emails, invoices, embed on your website or print and paste near your billing counter. Customers will scan this QR Code, enter the billing amount, and confirm the payment.
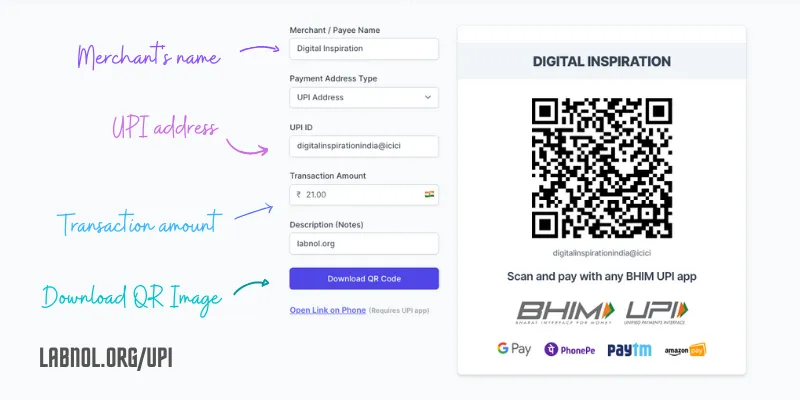
The QR code provided by UPI apps are static and thus do not include the amount that has to be paid by the customer. Our UPI QR Code generator is designed solve this problem. It generates a dynamic QR Code that includes the amount and thus the merchant can control how much the customer has to pay after scanning the QR code.
Visit labnol.org/upi to generate dynamic QR codes for UPI payments. The website does not collect, store or process any of the data you enter in the QR Code form.
UPI QR Code in Google Sheets
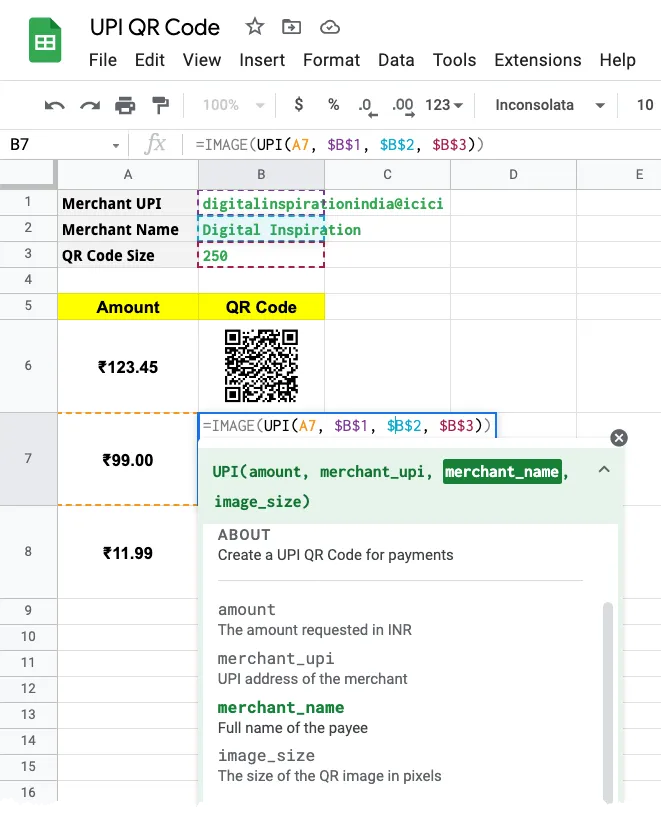
If you are using Document Studio to generate customer invoices inside Google Sheets, you can write a simple function to embed the payment QR code in your PDF invoices. QR Codes can be added in emails as well that are sent through Gmail Mail Merge

Go to your Google Sheet, click the Extensions menu and choose Apps Script Editior from the dropdown. Copy-paste the UPI function inside the script editor and save your project.
/**
 * Create a UPI QR Code for payments
 *
 * @param {29.99} amount The amount requested in INR
 * @param {"xyz@upi"} merchant_upi UPI address of the merchant
 * @param {"Blue Widgets"} merchant_name Full name of the payee
 * @param {"250"} size The size of the QR image in pixels
 * @return The QR Code
 * @customfunction
 */

function UPI(amount, merchant_upi, merchant_name, size) {
  if (amount.map) {
    return amount.map(function (amount2) {
      return UPI(amount2, merchant_upi, merchant_name, size);
    });
  }

  const googleChart = `https://chart.googleapis.com/chart?cht=qr&choe=UTF-8`;
  const upiData = `upi://pay?pn=${merchant_name}&pa=${merchant_upi}&am=${amount}`;
  return `${googleChart}&chs=${size}x${size}&chl=${encodeURIComponent(upiData)}`;
}
Now you can add the QR code to any cell in the Google Sheet by using the UPI function in combination with the IMAGE function as shown in the following example:
=IMAGE(UPI("19.95", "digitalinspirationindia@icici", "Digital Inspiration", "200"))How UPI QR Codes are Generated
Internally, the QR Code for UPI payments contains the merchant’s UPI ID, the amount to be paid and the payee name in the following format:
upi://pay?pa=<merchant_upi_id>&pn=<payee_name>&am=<amount>&tn=<transaction_notes>If the am parameter is not provided in the UPI url, the customer will have to manually enter the amount in the UPI app before confirming the payment. The UPI deeplink specs also recommend using the mam (minimum amount) parameter to specify the minimum amount that the customer has to pay. Set its value to “null” so that the customer cannot pay less than the specified amount.
You may also include custom notes in the QR code and these will be sent to you in the transaction history of your bank statement.


