If you using Amazon S3 (or CloudFront) for your web hosting needs, here are some essential tips that you should know about.
The tips discussed here will also help reduce your monthly S3 bandwidth (thus saving you money) and you don’t have to be “technical guru” to implement them. There are a couple of good S3 file managers that provide a visual interface to manage S3 though my personal favorite is CloudBerry Explorer.
Tip #1: Are people misusing your S3 files
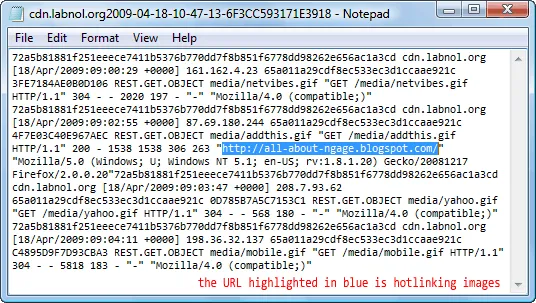
Amazon S3’s bandwidth rates are inexpensive and you pay for what you use. The problem is that if other websites are hot-linking to your S3 hosted content (like images, MP3s, Flash videos, etc.), you’ll also have to pay for bandwidth consumed by these sites.

Unlike Apache web servers where you can easily prevent hot-linking through .htaccess files, Amazon S3 offers no such mechanism but what you can do is enable logging for all your S3 buckets. Amazon will then log all client requests in log files that you can parse in Excel to know about sites misusing your content.
Send the owner an email or simply change the name /location of your S3 object and update your web templates to reflect the new web address.
How to Implement - Create a new S3 bucket to store your logs. Now right-click the bucket name and choose “Logging”.
Tip #2: Create Time Limited Links
By default, all public files in your S3 account are available for download forever until you delete the file or change the permissions.
However, if you are running some sort of contest on your site where you are giving away a PDF ebook or some MP3 ringtone to your visitors, it doesn’t make sense to have those file live on your S3 server beyond the duration of the contest.

You should therefore consider creating “signed URLs” for such temporary S3 files - these are time limited URLs that are valid for a specific time period and expire afterwards (or return 404s).
How to Implement - Right click a file in the S3 bucket, choose Web URL and then set a Expiry Time. Click Generate to created a “signed URL”.
Tip #3: Use Amazon S3 without a Domain Name
It’s a common myth that you need to have a domain in order to host files on Amazon S3. That’s not true.
Simply create a new bucket on Amazon S3, set the file access to public and Amazon will provide you with a public URL which is something of the form bucketname.s3.amazonaws.com/filename
Tip #4: Set Expiry Headers for Static Images
It is important that you add an an Expires or a Cache-Control HTTP Header for static content on your site like images, Flash files, multimedia or any other content that doesn’t change with time. For a more detailed explanation, please see this post on how to improve website loading time with S3.
The gist is that all web browsers store objects in their cache and this Expires header in the HTTP response tells the browser how long that object should stay in the cache. So if it’s a static image, you can set the Expires date sometime in future and client browser won’t request the object again if the same visitor views another page on your site.
How to Implement - To set an expires header, right click the S3 object properties, choose HTTP headers and add a new header. Call it “Expires” and set an expiration date like “Tue, 12 Apr 2010 01:00
GMT”.Tip #5: Use BitTorrent Delivery for large files
If you are planning to distribute some large files of the web (like a software installer or some database dump) via Amazon S3, it makes to sense to use BitTorrent with S3 so that you don’t necessarily have to pay for all the download bandwidth.
Each client will then download some part of the file from your Amazon S3 (“seeder”) and some part from other torrent clients, while simultaneously uploading pieces of the same file to other interested “peers.” Thus your overall cost for distributing that file on the web get lowered.
The starting point for a BitTorrent download is a .torrent file and you can quickly create a .torrent file to any S3 object by adding “?torrent” to the original web URL.
For instance, if the original S3 object URL is ..
http://labnol.s3.amazonaws.com/software-installer.zip
..the torrent file for that object will be
http://labnol.s3.amazonaws.com/software-installer.zip**?torrent**
Later, if you want to prevent distributing that file via BitTorrent, simply remove anonymous access to it or delete the file from the S3 bucket.
Tip #6: Block Google & search bots
To prevent bots from indexing files stored in your Amazon S3 buckets, create a robots.txt file at the root and it should say:
User-agent: * Disallow: /
Make sure that you update the ACL (or access permissions) to public else spiders won’t find your robots.txt file.


