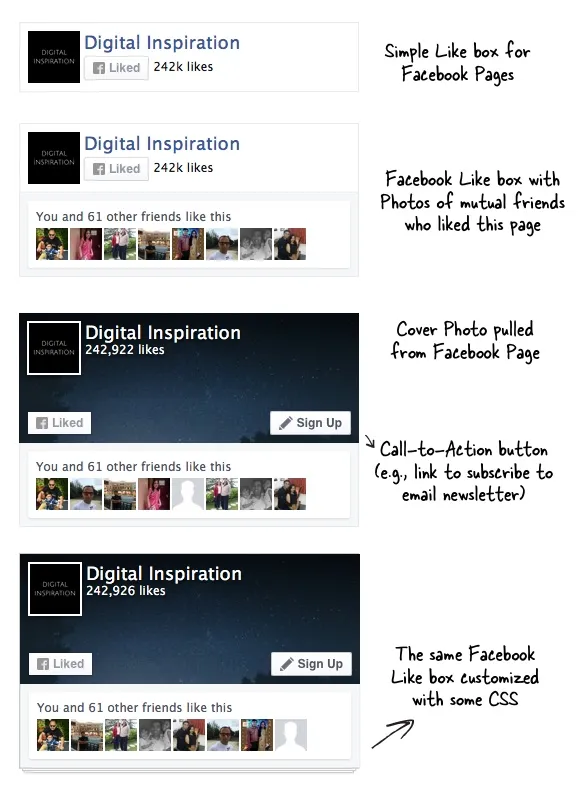
The old Like box for Facebook Pages has been deprecated and replaced with a new Page Plugin. If you have not manually upgraded the embed code for Like box on your website yet, no worries as Facebook has automatically migrated all the Like boxes using the old embed code to the new Page Plugin.
Unlike the previous Like box that carried too much Facebook branding, the new Facebook Page plugin is cleaner without any branding. You can now display the cover photo of your Facebook Page inside the Like box. You can also add a “Call to Action” button that will redirect people to your email newsletter or prompt them to install your mobile app and so on.
The other difference that you can now only display a single row of fan pictures inside the Page Plugin. Why does this matter? The pile shows profile pictures of mutual friends who have liked your Facebook Page and thus, when a casual visitor sees a familiar face inside that pile, it is likely to increase their interest in your website.
What you see here are a list of customization options now available inside the Facebook Page plugin. You can choose to have a simple Like box with just your logo and like button or you can have a complete box with cover photos as well.

Customizing this Facebook Page plugin is simple as detailed in the official documentation. For instance, if you would not like to show a cover photo, set the HTML5 data attribute data-hide-cover to false in the DIV tag. Setting data-show-facepile to false will hide the row of pictures.
Similarly, you can attach styles to the .fb-page class to customize the outer of the Facebook Plugin. For instance, if you like the steps style I use here with the Facebook box at labnol.org, this is the underlying CSS code.
<div class="fb-page"
     data-href="https://www.facebook.com/digital.inspiration"
     data-small-header="false"
     data-hide-cover="false"
     data-show-facepile="true"
     data-show-posts="false">
</div>

<div id="fb-root"></div>

<style>

  .fb-page, .fb-page:before, .fb-page:after {
    border: 1px solid #ccc;
  }

  .fb-page:before, .fb-page:after {
    content: "";
    position: absolute;
    bottom: -3px;
    left: 2px;
    right: 2px;
    height: 1px;
    border-top: none
  }

  .fb-page:after {
    left: 4px;
    right: 4px;
    bottom: -5px;
    box-shadow: 0 0 2px #ccc
  }
</style>

<script>
  (function(d, s, id) {
    var js, fjs = d.getElementsByTagName(s)[0];
    if (d.getElementById(id)) return;
    js = d.createElement(s); js.id = id;
    js.src = "//connect.facebook.net/en_US/sdk.js#xfbml=1&version=v2.4";
    fjs.parentNode.insertBefore(js, fjs);
  }(document, 'script', 'facebook-jssdk'));
</script>

