**This article describes how you can free up space in your Gmail mailbox by removing bulky email messages and large file attachments. **
While Yahoo! Mail and Windows Live Hotmail offer POP3 access to your email, Gmail (and Google Apps for Email) is probably the only free web mail service that also provides free offline access to your email messages via the IMAP route.
The benefits of using IMAP4 far outweigh POP3 - the primary feature being instant synchronization of the action with the mail server. As an example, if you have configured Outlook or Thunderbird with your Gmail account using IMAP4, you can delete messages in the local client and they’ll get moved to the Trash folder in Gmail as well automatically.
New tutorial added: How to Sort Gmail Messages by Size
Free up Space in Gmail via IMAP - The Strategy
Now the more interesting part. Let’s see how we can free up some important disk space in our Gmail inbox using a simple strategy:
- Track down bulky email messages in your Gmail inbox that contain large file attachments.
- Save these attachments to the local hard drive.
- After the attachments are saved locally, remove them from the online mailbox without deleting the corresponding email message(s).
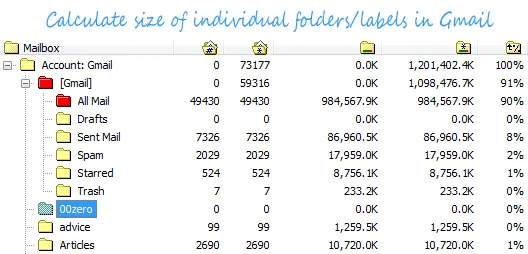
Unlike Outlook, Gmail doesn’t offer a “sort by size” feature so you would normally assume that to implement such a strategy, one may have to configure his desktop mail client with Gmail’s IMAP, perform the operations locally and then do a sync. Well, that’s not required anymore.
We’ll use a portable (meaning it doesn’t need to be installed) and freeware utility called IMAPSize - at the outset, let’s be quite clear - this isn’t an email client per se. This Windows only application has been created solely to perform maintenance tasks on any IMAP mailbox from the desktop.
Find space-hogging Email Attachments in Gmail
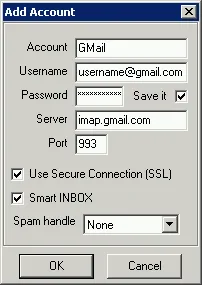 Let’s start off by adding a Gmail or Google Apps for Domains mailbox.
Usually, on first starting the IMAPSize program, a dialog box pops up asking if you’d like to add a new email account. If it doesn’t, one can always add an account from the Account > New menu option.
To configure your Gmail account, fill in your email address as the username and your Gmail password. Enter imap.gmail.com as your server and the port number as 993. Be sure to check the SSL secure connection option so that data sent between your computer and the Gmail server can’t be intercepted.
If you are a Google Apps user, please enter username@your_domain.com for the username field.
You’ll now see a tree indicating the size of individual Gmail folders (labels). Even with the exceedingly generous storage quota offered by Gmail, if you have an IMAP account with another provider like FastMail.fm, VFEmail.net, 1and1.com or RackSpace, it might be worth noting which folders in particular are occupying the maximum space.
Now the next step - double-click any Gmail folder in the tree to see all message within that folder. IMAPSize will only download the headers and not the entire message so the wait may not be that long.
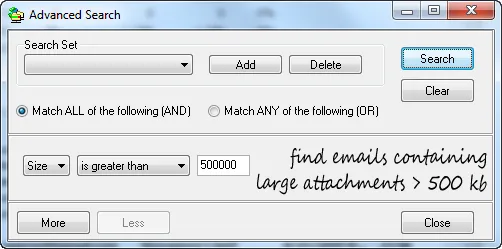
Once your message list is available locally, invoke the “Advanced Search” function to filter out large emails (or ones that contain huge attachments). You need to specify the size in kilobytes so 500000 would filter out emails that are larger than 0.5 MB or 500 KB.
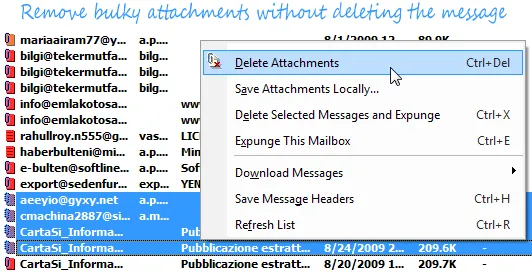
Go through the filtered list and select emails messages that you either want to remove completely or just need to detach the attachments. You can do that by right clicking the selected messages and choosing “Save Attachments locally” - this will save of copy of file attachments to the local drive.
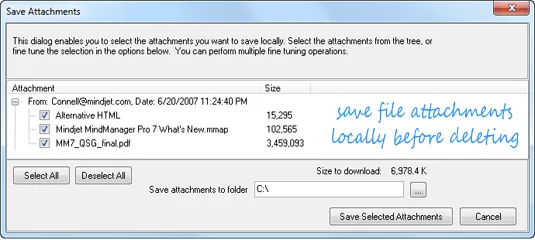
Now use the Delete Attachments option for the same selection. This will make a copy of the original email in same the Gmail folder buts sans the attachment while the original message is moved to Trash after you choose “Expunge this mailbox”. (Outlook has such a feature by default).
All this happens without the main body of the email getting downloaded thereby saving on bandwidth as well as on time. And this may be neat option for saving those images and media files for offline use when Gmail is not available.
Last, but by no means least is an option to backup your IMAP account to your local disk while preserving the folder structure. Use the Account > Account Backup [CTRL+B] option to select the folder you want to backup - most Gmail users would be better off backing up the All Mail folder to archive everything locally.
Naturally, expect a great deal of time to elapse if you have lot of messages and a slow Internet connection. Incremental backup is an in-built feature, so your next backup shouldn’t take as long as only the changes made to the mail account will be taken into consideration.
For Desktop Mail Clients
If you are already using Outlook or another desktop client with Gmail, seee this guide on how to reclaim lost space in Gmail using a similar approach. And if you aren’t happy with speed, here’s another guide on improving Outlook performance with Gmail IMAP.
By Shahrzaad M Parekh.


