The problem: You have a network printer attached to a Windows 64-bit computer. How do you send files to that shared printer for printing from a laptop that is running the 32-bit version of Windows.
For the most part, the transition from 32-bit (x86) to 64-bit (x86-64) computing is seamless; old software applications will usually install and run fine, and the average user will notice no difference in the 64 bit version.
Device Drivers are however the only thing that can hamper a successful transition to the 64 bit world, especially if you use hardware devices that are shared over a network from a computer running a 32 bit version of Windows. For example, if you have a computer running a 64 bit version of windows and try to install a network printer that is connected to a computer that is running a 32 bit of Windows, you will receive an error message saying that Windows cannot find the drivers for your printer.
If the printer vendor provides 64 bit drivers, you can still use the printer with your new 64 bit computer but it might take a bit of extra work.
Is Your Computer Running 64-bit version of Windows?
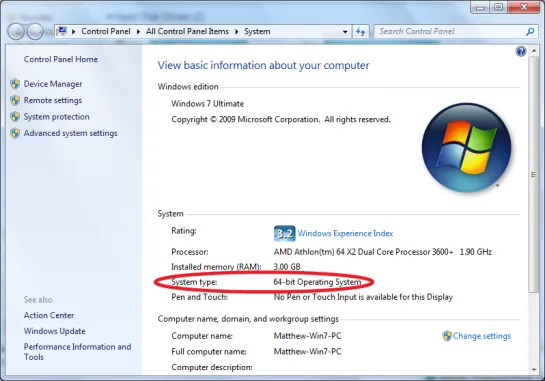
To find out if you are running a 64 bit version of Windows, click the Start button, right-click on the entry that says Computer and click on the Properties button. This will tell you whether you system is running a 32 bit or 64 bit version of Windows.

Get your printer working on both editions of Windows.
By default, when you install a printer, only the drivers for the version of Windows you are using are installed on the computer. So even if the installer contains the 64 bit drivers, these will only be installed by default if you are installing them on a 64 bit computer.
But in the situation of a printer that is shared over a network, the computer that the printer is directly connected to supplies the drivers to any other computer that tries to print through that printer. Thus it needs to have both the 32 bit and the 64 bit drivers installed if both types of systems are running on your network.
Install 32-bit & 64-bit Device Drivers
There is a way to get the extra drivers installed on the computer, however; it just takes a little more work.
First, make sure the printer is installed and running correctly from the main computer that it is connected to. Then download the 64 bit (or 32 bit drivers if the computer that is connected to the printer is a 64 bit system) driver for your printer. Most printer manufacturers (HP, Cannon, Epson, Lexmark, etc.) list drivers for both 32-bit and 64-bit versions of Windows, and often both drivers are in the same installer.
Next, run the installer on the host computer (the one the printer is connected to) just like you were going to install the driver on the computer. Then when it asks if you want to update or uninstall, click cancel.
Now, you need to find the folder that driver was extracted to. Open Run (Win+R), and type in “C:\Users\your user name\appdata\local\temp” without the quotes, and substitute your user name where I have the user name in italics. Now find the folder that was created most recently and doesn’t begin with a parenthesis.
On my computer, after installing an HP printer the folder name started with a “7z” and then had a half dozen other random characters. The folder should contain folders that say things like drivers, images, and a couple of other things, and it should also contain a lot of files that have the model name of your printer. Now click on the address bar, select the entire line, and copy it (Ctrl+A and then Ctrl+C).
Now the instructions change a little depending if you are using Windows Vista or Windows 7.
If you are using Windows Vista (or Windows XP), open the control panel, click on printers, then right click on the name of the printer that you want to add the drivers for. Click Properties, sharing, then click “Change Sharing Options.” Check the box that says “Share this printer,” and then click the button that says “Additional Drivers.” Skip the next paragraph, then follow the remaining directions.
If you’re using Windows 7, open the start menu, click on Network, then double-click on your computer’s name. Now click on the link in the top menu bar that says “View remote printers.” Right click on the name of the printer you wish to share, click properties, and then click the tab that says sharing. Check the box that says “Share this printer,” and then click the button that says “Additional Drivers.” Now follow the remaining directions.
After clicking the “Additional Drivers” button, check the box beside the version of Windows you wish to add drivers for (x86 for 32 bit or x64 for 64 bit). When you click Ok, it will ask you for the location of the drivers. Paste (Ctrl+A and then Ctrl+V) the name of the folder that you found in the step before last. Close the dialogs when they are finished. Congratulations; you have now installed the additional drivers!
Finally, return to your computer that you will be using to print over the network, and add the network connected printer. It should install easily now, and you should be printing in minutes.


